SHTFPreparedness may collect a share of sales or other compensation from the links on this page.
The Rule of Three states that in three weeks without food, the average person dies from starvation. The reality is that if you are still alive, hunger and malnutrition severely limit your ability to function.
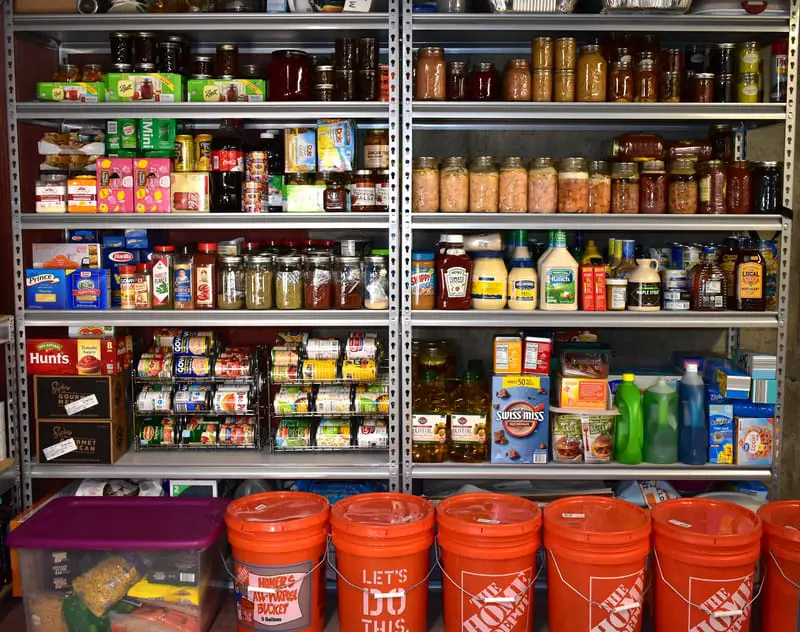
To not only survive but thrive during a long-term emergency, you need food. The key is a well-thought-out and well-organized prepper pantry.
A prepper pantry provides the depth and breadth of calories and nutrition required to help you endure a variety of emergencies. From short-term interruptions such as weather events to long-term grid-down events, your pantry needs to cover you.
A prepper pantry means convenience and safety. Life-saving convenience, that is. Your pantry saves you from deciding between letting your family starve and a dangerous foraging trip into the wilds.
Let’s look at how to build and stock a prepper pantry to keep you and your family safe.

What is a Prepper Pantry?
A prepper pantry is more than a pile of food left neglected in a corner of your basement. A prepper pantry is a well-thought-out and well-maintained food pantry of shelf-stable goods.
Further, the contents you specifically select should be suitable for use both in normal times and in times of disaster.
These critical supplies include dry goods such as beans, rice, oats, flour, pasta, corn, and corn flour. Canned goods include vegetables, fruits, soups, and stews.
Proteins for your prepper pantry can include canned meat such as beef, pork, ham, tuna, and chicken, as well as chili and other mixes.
Don’t neglect fats! Include oils, lard, and nut butter. Sugars can include white and brown sugar, honey, and jellies.
Finally, there are a few miscellaneous items, such as potato flakes, dried milk, protein powders, electrolyte drinks, salt, and spices. Oh, and don’t forget the water!
At its very core, a prepper pantry is a personal grocery store. Grocery stores have turned the maintenance of large stocks of food into a science.
They select foods that are most appealing to their customers, will last on the shelves until they are needed, and rotate them, ensuring that they stock the shelves with the freshest product possible.
This is your goal. Set aside space for food that you like to eat. Select foods that will last, e.g., that are nonperishable. Rotate those foods constantly and consistently.
Let’s look at the keys to building up your pantry.
How to Organize Your Prepper Pantry
Any large collection of goods needs to be organized. Failure to organize can lead to over-buying, under-buying, or loss because of expiration or spoilage.
You must develop an organizational scheme that spends your money wisely, reduces your time spent searching and sorting, and reduces the risk of forgetting about what you have stored.
Expiration Dates
First, a quick note about expiration dates. Most dates provided on food these days are actually “Best By” dates. As this day approaches and passes, the food does not expire.
The date is how the manufacturer ensures that the food is at its peak taste and nutrition. As the food goes beyond the date, nothing happens.
Let me say that again. The best dates are not magical dates beyond which the food turns instantly nasty and deadly.
It is perfectly ok to eat a can of beans, corn, or Spam soon after the Best By date. I am a living testament to eating expired food. It’s up to you to determine your tolerance for past-date food. One month, one year, one decade. It’s your call.
As with food before the listed date, always use your senses. Check the can for defects, including rust spots and bulging.
If your can or jar lid has these, then toss the can. Once opened, make sure that the smell is okay, the food looks okay, and any liquids are appropriately clear and not off-color. Again, if there are any signs of spoiling, then toss it.
I strive to have a pantry full enough that I’m always eating food at or shortly after the stamped date.
Assuming that most Best By dates are one-year post-manufacture, I, therefore, have a one-year supply of that specific food in the pantry. Effect this across an entire pantry and I have a great start at a year’s worth of food.
Working Pantry
Lay your food stores out as a “working pantry”. This means that you are pulling foods from it with regularity.
There are several benefits to this process.
If you lock your pantry away in a forgotten corner, you won’t visit it, you won’t check the contents, and you won’t find any issues that may crop up. There are situations for this type of food storage, but your prep pantry is not one of them.
Next, as you regularly pull from your pantry, you invariably review what you have and what condition it is in. You notice bulging cans and long-expired food. Shortages are clear. Excesses are apparent.
Finally, when you pull cans or boxes from the pantry, you create a plan to replace them. Even better, add before you delete. This creates a constant rotation of the items in your pantry. Everything is as fresh as possible.
FIFO: First In, First Out
The next step is physical organization. The first can, box, or bag stored is the first one that is pulled out. This FIFO (first in, first out) method ensures that you are always using the oldest sample in your pantry. Every can behind the front can is newer.
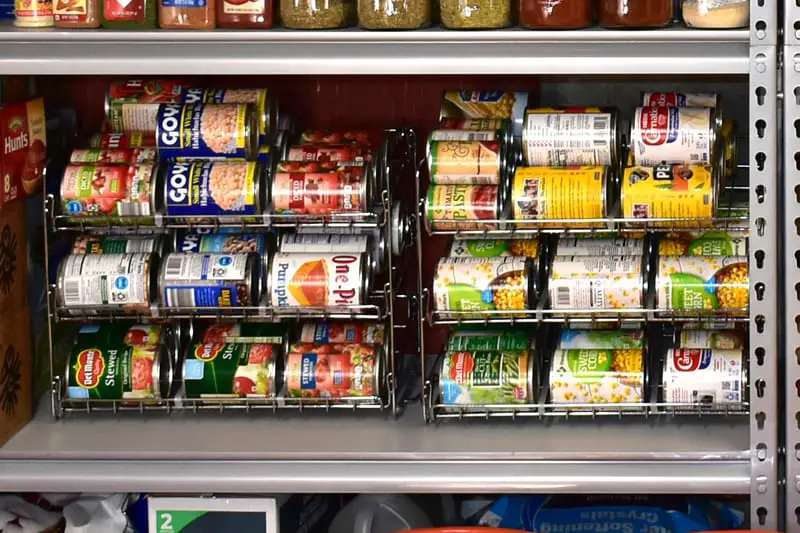
You achieve this process via FIFO storage racks or via date labeling and smart usage. FIFO racks allow you to add to the top and pull from the bottom. They are the easiest way to enforce FIFO usage. Their cost is moderate, but they are worth it if you have the room.

Labeling is a low-cost solution. Simply mark each case or can with the purchase date and always put the newest can or case in the back of the stack. This requires a little more discipline, but it’s free.
In my case, we have two pantries. The first is all case goods. Any open cases move to the “short” pantry. The open cases are always the oldest in the pantry and they are physically separated. This creates a gap in the main pantry. Any item that isn’t full to the top requires a shopping trip.
Finally, in our FIFO stacks, we clearly separate the goods. All the corn is in one spot, canned sauces in another. Proteins are separate from the veggies, which are separate from the fruits.
Related: How to Build a DIY Rotating Canned Food Storage System
Restocking
A prepper pantry requires restocking. As you use it, restock it. Otherwise, your shelves will be bare when you most need them.
There will be two phases to building up your pantry. The first is the process of filling the pantry to capacity. We will talk about this in the next section. Once you are there, you need to keep it full.
Regardless of your selected capacity, you need to keep the pantry full. Every time you draw from the pantry, refill it. In our case, the act of opening a case of mushrooms, olives, or tuna means it is removed from the pantry. This results in two actions.
First, it creates a visible gap in the pantry. What should be full is now depleted. Next, we add that item to the list.
This ensures that the moment we use something, it gets filled during the next trip. The result is a household that is full as it can be. Fill in every gap at the next opportunity.
How to Build Your Prepper Pantry
Ok, you have the space and the organizational plan; now it’s time to stock it up. First question. What do you stock it with?
What Do You Eat
First, stock foods you eat and like. A basement of beans and rice does you no good if you don’t like them. Would you prefer pancakes for breakfast?
Several bagged brands store for years and only require water. Stack these high and deep. Do you prefer potatoes and corn over green beans and asparagus? Buy potatoes by the case and avoid the green beans.
Let’s be realistic. If you don’t like it, you won’t eat it. Hunger is the best spice, but this only goes so far. Worse yet, food fatigue will drive you away from things you like, given enough time. Make sure that your pantry includes variety.
One of the best ways to manage this is through spices. I specifically dedicate valuable shelf space to spices. Is new basil better than year old basil?
Yup! But plain rice, day in and day out, will fatigue your pallet. I’ll take rice seasoned with old basil over a plate of plain rice just to have the variety.
Next, make sure to include the raw components of everyday meals. This includes four: sugar, oils, and salt. They are easy to forget when you are focusing on canned goods.
Also, stack up the treats. Life is too short to live without chocolate! Get a few bags.
Store What You Eat
In order to identify what food supplies to store, look at your current cupboards. Even better, keep a log for 30 days of EVERYTHING you eat.
Breakfast, lunch, and dinner—add every item to the list. Keep a log of types and quantities. Use this to identify how much you need for a month and extrapolate to six months or longer.
Second, fill it with shelf-stable foods. This includes canned and dry goods. Ideally, you will use foods with a shelf life of a year or a Best By date that is a year out.
Third, add variety. Much of the world lives on little more than beans and rice. That doesn’t mean that you have to. It also doesn’t mean that it’s a healthy diet plan.
Nutritional variety is the key to thriving during a long-term emergency. You may have your favorite food, but is it balanced?
Try to strive for width rather than depth. It’s tempting to load up on cases of potatoes when they go on sale in the fall, but eating only starches creates a nutritional debt that can be hard to fill. Instead of four cases of potatoes, get two and then two of the other vegetables.
Pantry Sources
I recommend the grocery store as your main source of prepper pantry goodies.
However, feel free to expand into other areas to add both flavor and utility. Our pantry has a few months of canned and boxed goods from the local grocery store, but that’s not all.
It also has a month or two of freeze-dried emergency foods and components. We have several meals represented (stews, mac and cheese, etc.) as well as individual vegetables, fruits, and desserts.
Please note that these are expensive, but we’ve been able to hit the sales and build the stores up over the years.
Finally, don’t forget about canning your own prepper pantry supplies. We water bath can, pressure can, and dehydrate. Our water-bathing favorites include veggies from the garden, jellies, jams, fruits as pie fillings, and a few foraged mushrooms.
Pressure canning is where we stack up the proteins. Chicken, pork, and stews, too numerous to count, augment the commercially purchased goods.
Keep it Safe
Canned goods are protected as long as they don’t get dented or wet. Boxed goods require a bit more protection.
If your storage area is free of pests and humidity, that’s great. In our case, the occasional mouse has forced us to store all paper-packed goods in plastic totes. This has kept the losses to almost zero over the past decade.
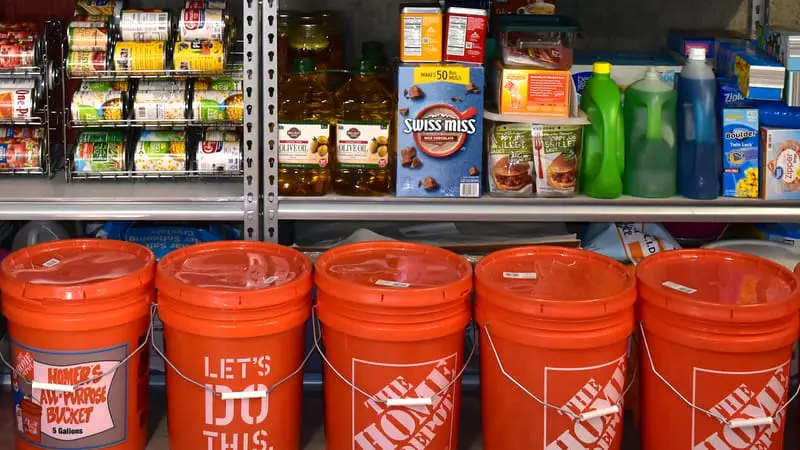
Protect bagged items, such as dried beans and rice, in totes or 5-gallon buckets. If you can smell through the container, so can mice and other critters. If in doubt, use 5-gallon buckets. They are cheap, strong, and stackable. Keep your food safe!

Next, choose a cool storage environment. The lower the temperature, the longer the shelf life. 50–60 degrees Fahrenheit is ideal. If you are storing in your basement and it gets a little humid, run a dehumidifier.
You will eventually build up quite the investment in your prep pantry. Take care of it! The pantry represents a significant investment in money and time!
How to Stock Up Your Prepper Pantry
So you know what to buy, and how to build your pantry. Assuming you aren’t made of money, do it over time! There’s no reason to go into debt over your survival pantry.
Copy Canning
Start with copy canning. This is the process of buying a little extra each trip to the store. If you normally buy one can of soup, copy that and buy two. Every trip, invest a little extra in filling up your pantry.
Building a pantry one or two cans at a time may feel slow. That’s because it is. That’s fine.
Look at it this way. After each trip to the store, you have one or two meals ahead of you. After a month, you are five to six. Within a year, you are ahead by a month.
What would an unprepared family do to be in your position when the grid fails? Take pride in every can you put on the shelf!
Sales and Coupons
Next, hit the sales! Foods, including most vegetables, have a season.
Every fall, the harvest comes in. This means that when the new batch is ready, there is a push to move out the old product. Every fall, our local stores cut the prices of most canned fruits and vegetables drastically.
Leading up to the fall, put a few dollars away in anticipation of the big sales. When they hit, buy big. It’s a great way to stretch your dollar and fill your pantry.
For other more expensive items, such as freeze-dried foods, be patient. I’ve never purchased freeze-dried food at less than a 50% discount.
Do I have everything I want in the quantities I want? No. But I have quite a lot and I’ve saved up to 75%. That being said, it’s taken me five years to get to a comfortable spot with this part of my pantry.
Finally, stretch your family dollar with coupons. Grab the Sunday fliers, join the local stores’ buyers club and target the discounts.
Make a habit of selectively choosing the brands that you can save a little on. Soon, the ability to buy a single can will become the ability to buy two or three.
The goal is to buy smartly! Before you know it, your prepper pantry will be full, and you’ll be investing in a new shelf system to take you from one month to three!
Closing Up The Prepper Pantry
Canned goods, boxed pasta, bulk beans, and rice, freeze-dried meals, and meals ready to eat (MREs) all have a place in your long-term storage.
Taking a methodical approach to building up your prepper pantry does not need to be expensive, daunting, or confusing.
Buy what you already eat. Shop when these items are on sale. Buy a little extra every trip. Organize your shelves. Eat the oldest foods first. These are simple rules to follow.
After a few months of following these easy tasks, you’ll be a little farther ahead every week. It’s like the old adage. How do you eat an elephant? One bite at a time. How do you store a month’s worth of food? One can at a time!
